Using


offers a medium for working with Peirce’s Existential Graphs; it is an application for Windows, written for the NET Framework 1.1. It currently has a module which permits the construction of Alpha and Beta Existential Graphs according to the “Rules of Illative Transformation” for Existential Graphs set down and employed by Peirce from the 1890’s to 1909 or so. There also is a module which permits the unrestricted generation of any “well-formed” Existential Graphs; this is necessary both for experimentation and for the generation of certain graphs which can be employed in the rule-bound version. Eventually, will be extended to parts of Gamma as well, and we will add modules to deal explicitly with the semantics of Existential Graphs (EG).


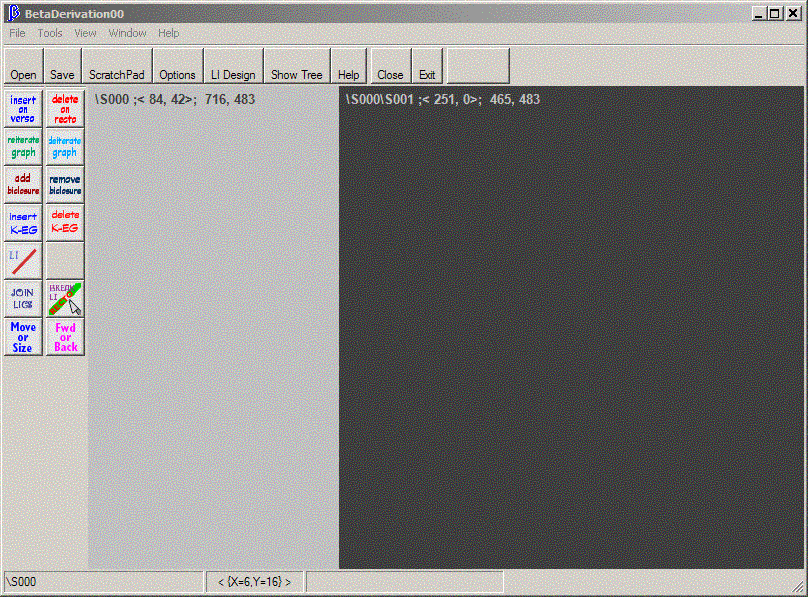
When is opened, what we see is


Figure 1. BetaDerivations Form

Clicking the "ScratchPad" Button or the "Tools > ScratchPad" Menu gives us
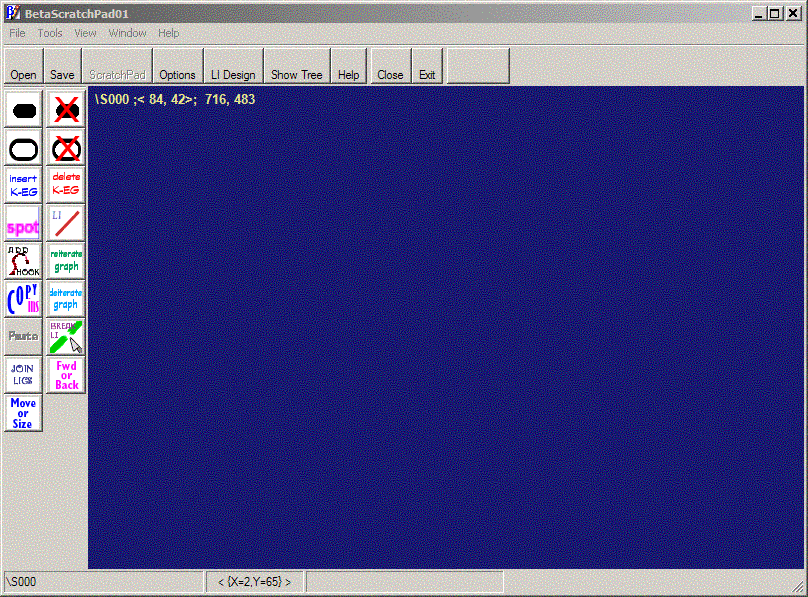
Figure 2. Beta ScratchPad Form


These are the basic media upon which Existential Graphs may be scribed and worked with. We will examine in some detail the basic Controls available to us for this work. First, though, we note that the main areas in the two Forms shown above are Sheets of Assertion for Existential Graphs. Actually, in the case of Figure 1, there are two Sheets of Assertion, or, perhaps, two sides of the same Sheet. The leftmost Sheet on that Form, named "S000"(n1) is, in fact a "Verso" area - meaning that it counts as "Oddly enclosed" in Peirce's rules of transformation for the Graphs; Sheet S001 is a "Recto"; it counts as "Evenly enclosed," and is what we normally think of as the Sheet of Assertion on which Graphs are constructed according to those rules of transformation. The Verso Sheet of Assertion in Figure 1 is an innovation which permits the "Insertion in Odd"(n2) of Hypotheses for the construction of a sort of "argument from hypotheses" on the Recto Sheet of Assertion (SA). The entire area in the Form of Figure 2 is a Recto Sheet of Assertion. The ScratchPad is used to construct any "well-formed" Beta Graph; this is useful for the experimentation which is an essential feature of this kind of logical work, and is essential for the creation of Graphs to be inserted on Verso areas of the BetaDerivations Form according with the rule we have just mentioned.


The Main Menus


The BetaDerivation and ScratchPad Forms share the Main Menu struture.


The Menu Structure (click a link for description)


File > Open Opens the "Open File" Dialog; permits the opening of valid XML files as graph constructions; opens a new instance of BetaDerivations in the proper format (Derivation or ScratchPad) for the given file. Although a DTD for validating these files is available at http://www.existentialgraphs.com/dtd/BetaGraphs.dtd, the current version of writes the DTD as internal to the XML files it saves; thus files saved with this version can be validated even if you do not have access to the Internet.
File > Save Saves the graph construction of this instance, provided it has been named and saved; else, opens the "Save As" Dialog.
File > Save As Opens the "Save As" Dialog; the graph construction may be saved as an XML file which may be opened as a graph construction, or as an SVG file, which may be viewed with an appropriate viewer or opened in certain graphics programs.
File > Save Screenshot
Opens the Screenshot Dialog, which permits the choice of a currently instantiated window to be imaged. This includes the Derivation and ScratchPad forms, as well as any dialogs that might be available, including this one. It also includes the windows of the existing ContainerGraphs. Because of the way this is done, the window imaged must be visible; note that any object overlapping it when "OK" is clicked (such as this dialog, for example) will be seen in the Screenshot. After "OK" is clicked, a Save File Dialog opens which allows you to put the GIF (or, if you choose, BMP) file where you wish.

File > [recent file list] As usual, permits the opening of recently used files.
File > Clear Recent Files Clears the recent file list
File > Close Instance Closes this instance of while leaving others open
File > Exit Closes
Tools > ScratchPad Opens a ScratchPad (see Figure 2), which permits the construction of any well-formed Beta Graph; such graphs may be inserted on Verso areas in the main construction.
Tools > Options
Opens the Existential Graphs Options Dialog, which permits the setting of various properties of the Graphs, including the Root Sheet of Assertion Background Color (Background Color of other graphs is determined by their position in the Graph-Tree), whether or not to show Diagnostic Labels in Container Graphs, certain features of the "Hypothesis Area" if one exists (this is the Verso of the Root Sheet of Assertion in the BetaDerivations version of the Form; this feature is disabled for the ScratchPad). Also, the Font employed to show the Variable Name of Spots (predicates) may be set, including whether the change affects all Spots or only those Scribed subsquently. Finally, you may elect whether or not to show the Borders of Spots (with a thin line in the Spot's ForeColor); this Option is initially set to "Yes"; see the View > Show Spot Borders Menu Item.

Tools > LIDesign
Opens the Existential Graphs Line of Identity Design Dialog; this permits the setting of certain details of appearance of Lines of Identity subsequently generated by dragging a rectangular area on a ContainerGraph. Note that although the next color to be applied to a Line of Identity is shown, the colors are sequenced automatically and can't be chosen by the user. The width in pixels of the next LI and its general shape, however, can be chosen.

Tools > Show Tree
"Tools > Show Tree" opens a non-modal Dialog (this means that the Dialog can be open along with the main Form while still permitting work with that Form); this Dialog includes a TreeView of the Graph Construction currently being developed; this has the Root SheetOfAssertion as its only Root element. The partial ordering of Graphs is by inclusion, and Hooks are included under the Atomic Graphs to which they belong. There also is a Ligature Tree, which has the Ligatures in the Construction as its Root Elements, with the Atomic Graphs and then their Hooks under the Ligatures. Clicking one of the Elements in either Tree opens a Property Page for that element. Properties may be read, and in some instances, changed. Colors identify separate Ligatures and the elements which belong to them.

The diagram immediately below is a Graph Construction taken from ; it involves 5 Ligatures, 3 of which include multiple Atomic Graphs (two Dots - Lines of Identity - each, as well as the Hooks belonging to the Spots to which those Ligatures are connected). Connections between disparate Dots of the same Ligature are shown in this Diagram; there will be occasions when it will be more convenient not to show them. In two cases, these connections cross Graph boundaries, which is not possible for a single Existential Graph, as Peirce noted. But the visible connection represents the continuity - across these lines - of self-identity.

The structure of this Graph Construction is reflected in the Tree Diagrams opened by the "Show Tree" menu (or ToolBar Button). The Control in this Dialog we haven't mentioned is a List of Graphs once extant but now inactive; there were none such for this diagram.

 
Tools > Set Root SA Size If the user requires precise control over the physical size of the Construction, this Item affords it; clicking this Menu Item gives the following Dialog:

Set the Width and Height and click "Set Size"

View > Line Connections
The "View" Submenus permit us to make a variety of changes in the appearance of the Graph Construction; the "View > LineConnections" menu permits us to show connections between Hooks belonging to different Dots (Lines of Identity) of the same Ligature; thus,
becomes
The connection between the Hooks (in this case, 02 and 07) must have been established at the time the Lines of Identity were joined into the same Ligature, or later through the "Intra-Ligature" connection feature of the Join Ligatures Dialog. Such connections are shown iff this menu item is checked.
View >Diagnostic Labels Diagnostic Labels are not displayed in the two graphs pictured above; they are, however, shown in previously pictured graphs. They consist of the path to the ContainerGraph, its location in pixels in form "<X, Y>", and its size in pixels in form "Width, Height." The Path shows the string of graphs in the Tree from the Root to the current graph. The Names of the graphs are of form "Snnn" for Sheets of Assertion, "Knnn" for ConjunctiveEGs, and "Cnnn" for Cuts. Diagnostic Labels are shown iff this item is checked.
View > Show Spot Borders
Spot Borders ARE displayed in the above Graphs. These are clearly not Cut or ConjunctiveEG borders and demark the live area of a Spot; un-checking this Menu Item removes these borders. An equivalent option choice is available on the Graph Options Dialog.
Showing Spot Borders NOT Showing Them
View > Hooks Simply makes the Checked Menu Items for Hook Numbers and Hook Locations avaialble
View > Hooks > Hook Numbers Hook Numbers (which are global within this construction) are displayed in the ParentGraph of the Hook's OwnerDot iff this item is checked.
View > Hooks > Hook Locations Hook Locations are displayed as a contrasting round mark in the Hook's OwnerDot iff this item is checked
Window > Tile Clicking this item causes Beta Derivation and ScratchPad Forms to be tiled on the available Desktop. Note that such forms may be open as new starts, or as the result of opening saved XML files.
Window > Cascade Clicking this item Cascades the Forms.
Window > [open file list] Transfers the focus to the Form whose entry is clicked.
Help > BetaDerivations Help Gives access to Help.
Help > About BetaDerivations Shows the "About BetaDerivations" screen.


The Top ToolBar


This just offers convenience in doing some of the operations accessible through the Main Menus (click a Button for its function).

Open Same Function as File > Open
Save Same Function as File > Save
ScratchPad See the instruction for Tools > Scratchpad
Options See Tools > Options
LI Design See Tools > LIDesign
Show Tree See Tools > Show Tree
Help Pops up a Menu Equivalent to the Help SubMenu of the Main Menu; See Help > BetaDerivations Help and Help > AboutBetaDerivations
Close Instance See File > Close Instance
Exit See File > Exit


Context Menus


When you are constructing a Graph, any of the operations which may be performed at a given point on the surface of the Construction may be accessed by a right-click of the Mouse. The Context Menus which appear are the most basic way of doing these operations and are always available. They are not, however, the most convenient way of doing the construction, nor of learning how to do it. The available choices depend on whether we are working with a BetaDerivation or a ScratchPad, on the Type of Graph we are over and on its position in the Graph Construction; some other factors also enter here. The available Context Menu entries are a measure of what is permitted at a given point in a construction.


The Unrestricted Palette


We begin a discussion of constructing Graphs with the Palette of the ScratchPad, seen in Figure 2 above, and below left. Click a Button in the picture on the left for a discussion of that function (hovering the Mouse gives a brief tool-tip description).


Initiates construction of a Cut Initiates Deletion of a Graph or Graph-Nest Initiates Insertion of a Biclosure Initiates Deletion of a Biclosure Initiates Insertion of a ConjunctiveEG Initiates Removal of a ConjunctiveEG Initiates Insertion of a Spot Initiates Insertion of a Line of Identity Initiates Addition of a Hook to a Line of Identity Initiates Reiteration of a Graph Initiates a Copy for Insertion on a Verso (Oddly Enclosed) Area Initiates a Deiteration Initiates Pasting of a Copied-For-Insertion Graph anywhere in this ScratchPad's Construction Initiates the Breaking of a LI and so its Ligature to form a new Ligature Initiates the joining of two Ligatures Initiates the Forward or Backward (Z--Order) movement of a Graph with no change of ParentGraph Initiates the Moving or Sizing of a Graph with no change of ParentGraph

Insert Cut: Clicking this Button pops up a Menu which permits the user to insert a Cut by dragging, or to insert a Free-Form Cut. The Drag option changes the Mouse Cursor to a form with a Hot-Spot which allows the user to drag a Rectangular Marquee, which on Mouse-Up generates a Cut; any graph in the area enclosed by the Marquee will be placed in the new Cut. The Free-Form option produces a Cursor which may be used to place vertices of a polygon on the ParentGraph; a double-click places the final vertex and places the Free-Form Cut. Again, any graphs enclosed by the polygon will be on the new Cut.
Delete Graph or Graph-Nest: A menu permits choosing one of these options; if user chooses to delete a single Graph, the next Graph clicked on is deleted, and its contents are transferred to their "grandparent" ContainerGraph. Deleting a Graph-Nest eliminates the graph clicked upon and its contents.
Insert Biclosure: Lets user insert a Biclosure; Graphs within the innermost area of the Marquee are moved to the inner close of the Biclosure.
Remove Biclosure: Clicking in the outer close of a Biclosure (a Cut containing only another Cut, its inner close) removes the Biclosure and tranfers the contents of the inner close to the ParentGraph of the outer close.
Insert ConjunctiveEG: Permits insertion of a ConjunctiveEG by Drag or Free-Form, much like the Cut Insertion above. Any Graphs in the Area on which the ConjunctiveEG is inserted are placed on it as Children.
Remove ConjunctiveEG: Deletes the first ConjunctiveEG clicked upon after clicking this Button.
Insert Spot: Clicking this Button brings up the Spot Insertion Dialog; The user enters a Variable Name and number of Hooks; upon clicking "Add" the Mouse Cursor becomes a Letter (for the name, when it is a single letter) with a Hot-Spot when it is over a ContainerGraph. On clicking on the ContainerGraph, the Spot is instantiated with a new-Ligature Dot attached to each of its Hooks. The Hooks are at the center of the Spot and the "Dot-Stubs" emerge radially from under it.
Insert Dot: Pops up a menu for insertion of a Line of Identity (Dot) by Drag or Free-Form; note that the Free-Form option is not currently operative. Dragging a Marquee sets a LI in the basic form which is current. By default this is a diagonal from the point the drag starts to its end. Other forms, which may be chosen in the LI Design Dialog, are a "Swoosh," Vertical or Horizontal LIs, or just a Dot. The picture on the Button indicates the current choice of LI shape.
Add Hook: Lets the user add a Hook to a Line of Identity.
Reiterate Graph: Lets the user choose a Graph for Reiteration. After clicking this Button the Cursor changes to one that says "Pick Reit"; upon clicking on a non-Beta Graph (one with no Hooks at all) the Cursor changes to "Reit in Process" when over areas eligible to receive the Reiteration (those enclosed by at least all the Cuts enclosing the original, but NOT in the original itself); clicking with this Cursor finishes the Reiteration. If the Graph being Reiterated IS a Beta Graph, before we get a chance to place it, we need to deal with its Ligatures; for example,

This SheetOfAssertion has a Graph, K000 (a ConjunctiveEG) to be Reiterated; since it is a Beta Graph, its selection gives rise to the following Beta Reiteration Dialog:

This shows the Ligatures involved, as well as the allowed choices of Ligature identity for their parallels in the Replica of this Graph. Note that Lig000, being entirely within  Cut C000, may NOT be connected to its parallel. Lig001, however, has the option open of giving rise to a new Ligature or to a new part of itself. If we allow the Ligature Configuration to remain as shown here, clicking the "Accept" Button allows us to place a replica as follows:

Note that no visible connection is shown between the two LIs of Ligature Lig001 in the resulting graph; a connection may be made explicit in these cases; we will demonstrate this later.
Deiterate Graph: Clicking this Button initiates a Deiteration. The Cursor becomes "Pick Deit" and the user clicks on a Graph to be a "Deiteration Model"; the Cursor changes, and the user picks the Graph to be removed. The Graph to be be removed by the Deiteration must be "The Same As" the Model, and enclosed by at least all the Cuts enclosing the Model. Determination of "The Same As" is done by employing a set of overloaded functions which reflect Peirce's intentions. If the next Graph clicked meets "Is The Same As" criteria, it is removed.
Copy for Insertion on Verso: A major use of the ScratchPad is the composition of Graphs which may be "Inserted in Odd,' which is to say, on a "Verso Area" of a construction underway by strict rules of derivation. After clicking this Button, the Mouse Cursor changes when over the ScratchPad to a form similar to the Button with a HotSpot. After clicking a Graph the "Copy for Insertion" Cursor vanishes and a reference to the clicked Graph is stored; user then may move to where the Graph is to be inserted and execute the insertion by means appropriate to that location (this will be discussed). Now a copy initiated on this ScratchPad may be used to pass a Graph to any Construction in this run of Constructions. See entry immediately below, as well as Insert on Verso.
Paste Graph to ScratchPad: Click this button to initiate pasting of a graph Copied for Insertion (see entry immediately above) anywhere in the Graph-Construction of this ScratchPad. You get a "Paste" Mouse-Cursor which is used to place the replica. The Graph may be from any ScratchPad in this run of Graph-Constructions (those having the same initial BetaDerivation Form ancestral to them). The button is disabled (and so grayed out) if and only if no Graph is currently selected for copy (see entry immediately above).
Join Ligatures: Used when it is necessary to Join separate Ligatures or to make visible a connection between Hooks of the same ligature. Consider the following Graph configuration:

Suppose first that we wish to identify what is represented by the red and the green Ligatures; click the Join Ligatures Button, and then with the resulting Cursor, click a Line of Identity belonging to the Ligature which is to absorb the other; the result is the Dialog:

In this case, the Red Ligature was clicked and will be the color which survives the joining. The ComboBox for each Ligature lists the Hooks in that Ligature. Select one of the Hooks in the Red Ligature, and one in the Ligature to which it is to be united, in this case Green.

The result of clicking "Join with Visible Bridge" (and Checking the "Line Connections" entry in the View Menu) is as shown in the following Figure. The joining could be done without explicitly connecting Hooks in this manner. "Join without Visible Bridge" incorporates the Green into the Red Ligature without showing a connection. If "Join with Visible Bridge" is used and the "Line Connections" entry is unchecked, the Hooks carry a record of being connected, but the connection is not shown,

The Blue Ligature connected to Spot "C" has its outermost point in Cut C002. The connection can be made visibly explicit. This would not change the way that the Graph of C002 is read (it translates as (x)Cx with or without the visible connection, but it might make it easier to read, perhaps, under some circumstances - the difference might be thought of as being on the dimension of Pragmatics rather than of Semantics. Clicking the "Join Ligatures" Button and then the Blue Ligature gives:

Since we are interested only in the Blue Ligature, click the "Intra" Button for that Ligature. This disables the controls for the other Ligatures.

In the Blue ComboBox, select the first Hook for the visible connection - in this case, Hook008; the center Button now reads "Record First Hook";

After Recording the First Hook, select the second one

Clicking "Join with Visible Bridge" (combined with the checking of the View > Line Connections item) gives the following.

 
Sometimes it is necessary to move in another direction than that described above, that is, to break one Ligature into two. The "Break LI" button provides a means of doing this. Consider the following Graph Construction; our intention will be to break the Ligature in this Construction into two. The break will occur in the Line of Identity with Hook 06 at its left and Hook 07 at its right (n003 - see inventory of this state of the Construction).

Click the "BreakLI" Button on the Palette, and then, with the resulting Mouse Cursor, click Line of Identity D002 (the one containing Hooks 06 and 07); the result is the Dialog

Meanwhile, the Graph Construction changes to

The right portion of that Line of Identity belongs to a new (Cyan-colored) Ligature, Lig001. Note that in the "Assign Dots to Ligatures" Dialog as shown a bove, the new Cyan LI, named D003 here, is the only Object in the new Ligature; this is reflected in the Construction as shown just above. But LI D001 (which shows Hook 05 at one end) as well as its connected Hook003, which belongs to Spot A001 (the one that displays "B") are to be transferred to the new Ligature. So select D001 in the "Assign Dots to Ligatures" Dialog, and click the "Move to New" Button. The result in the Dialog is as follows:

 
Clicking the "OK" button effects the transfer, giving the Graph Construction (n004 - Inventory of this final stage):


The Line of Identity containing Hooks 09 and 07 might be moved to give a clearer view:


Movement of Graphs within the same area (that is, without changing their Containers) is always permitted in EG; changing the size of a Graph (ordinarily a Cut or ConjunctiveEG) is also always permitted. The "Move or Size" button is employed for this (a ContextMenu Item is also available for this). Clicking this Button gives a Move-or-Size Cursor; when an eligible Object (such as the Cut below) is Clicked with this Cursor,

it introduces a "Van" Object:

The closed rectangle in the center is a handle which enables the Graph Object to be moved; the open rectangle on the perimeter can be grabbed at an edge or a corner to size the object, provided sizing is appropriate. When the move or size is complete, the Van disappears
 
The "Fwd or Back" Button is used in case there is overlap between Graphs belonging to the same Container and it is desired to change their "Z-Order"; clearly, as with Moving and Sizing, this is an operation which does not affect the logic expressed by the Graphs, and so will be permitted at any time. Clicking this Button gives rise to a "Fwd or Back" Cursor, which when clicked on an eligible Graph gives a Context Menu permitting the user to move the Graph to the Front or to the Back of the Z-Order.


The BetaDerivation Palette


We will continue with a discussion of the Palette used in the derivation of Beta Graphs according to the Rules of Transformation proposed by Peirce. This Palette is seen in Figure 1 above, as  well as below to the left. As before, click a Button in the Palette as pictured below to go to a description of the function of that Button.


Initiates Insertion of a Previously-Prepared Graph on a Verso (Oddly-Enclosed) Area Initiates Deletion of a Graph-Nest on a Recto (Evenly-Enclosed) Area Initiates Reiteration of a Graph Initiates a Deiteration Initiates Insertion of a Biclosure Initiates Deletion of a Biclosure Initiates Insertion of a ConjunctiveEG Initiates Removal of a ConjunctiveEG Initiates Insertion of a Line of Identity Initiates on a Verso Area the joining of two Ligatures Initiates on a Recto Area the Breaking of a LI and so its Ligature to form a new Ligature Initiates the Moving or Sizing of a Graph with no change of ParentGraph Initiates the Forward or Backward (Z--Order) movement of a Graph with no change of ParentGraph

This operation involves a use of the Copy for Insertion operation on the ScratchPad. Suppose we are working on the BetaDerivation Form, and have a Construction that looks like this:

We wish to insert a certain Graph into the area of Cut C001 (see above); this is a Verso (Oddly enclosed) area (recall that Sheet of Assertion S000, the Root here, is also considered a Verso area - Sheet S001 is, then, the Recto Sheet of Assertion). The Graph to be inserted is Cut C001 and its contents located on the Sheet of Assertion of the ScratchPad:

To effect the insertion, click the "Copy for Insertion" Button, and with the resulting Cursor, click somewhere in Cut C001 (not, however in any of the Sub-graphs of  C001; clicking in one of these would select it for this insertion). The Copy for Insertion Cursor disappears, and a reference to C001 (and its contents) is saved. Now return to the BetaDerivation Form shown first in the current sequence, click the "Insert on Verso" Button, and then click in the area of Cut C001 there (the location of the click sets the UL corner of the inserted Graph). The result is the following:

The names of the Graphs and Hooks inserted adjust to the new context. If there had been Ligatures already present in the Beta Derivation, the Color of the inserted Ligature would also adjust. The Color of the ContainerGraphs inserted has also changed to fit the Colors in the new Context.
 
Consider the Beta Derivation

The Recto (evenly enclosed) areas here are those of Sheet of Assertion S001, Cuts C000 and C002, and ConjunctiveEG K000 (all have the darker Color). The Graphs which can then be deleted by the Delete on Verso Rule are C001, K000, Coo3, and D001 (the Red LI). Clicking the "Delete on Recto" Button gives a Cursor (over the non-Sheet of Assertion Graphs) which has a slash (and doesn't work) when over a Graph NOT eligible to be deleted by this rule; the slash vanishes and the operation works when over one of the graphs we have mentioned as eligible. Clicking in the area of Graph K000 causes it and its contents to be deleted:

 
This works exactly as does its equivalent on the Scratchpad.
See the Deiterate Graph on the ScratchPad.
Same as the equivalent on ScratchPad.
Works the same as the equivalent on the ScratchPad; however, works only for Hooks in the same Verso Area. The Hot-spot appears on the Cursor only over eligible Lines of Identity, and only appropriate Ligatures appear in the Join Ligatures Dialog.
Also the same as the ScratchPad equivalent; here, this works only for a Line of Identity in a Recto Area. The Hot-spot appears only over such Lines of Identity.
Same as the equivalent on ScratchPad.